From MSTS to Locomotion
Vehicles with more parts
Simple animated freight wagons
Multiple animated freight wagons
Information:
The vehicles built do no longer come up to todays common standard of graphics.
The first model

Welcome to a little tutorial how to transfer vehicles from MSTS (Microsoft Train Simulator) to Locomotion.
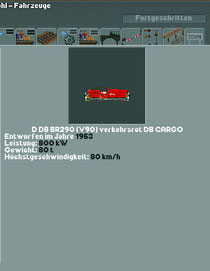
I will explain how to do that on the example of this locomotive.
(copyright(c)Wiesner Gerhard)
First read the readme of the MSTS-vehicle carefully. In there you can normally find the name of the author and, if available, who did the Repaint as well.
Those are the ones you have to ask for permission to transfer their work in every case. To do so tell them all rights will remain with them and that you will name them in your readme. Tell them that the vehicle will be offered for free download exclusively and add the page it will be available on, as well.
Now it´s time to wait and see since working overhasty would just be a waste of time.
Should the answer of the author be a negative one you would have to accept that since it could, in certain cases get very expensive if you build the model anyhow (International Coppyright).
If you have the permission of the author (given the case there is a repaint, you will need two permissions), you can begin.
Now download the following tools:
MSTS2loco - This programm is needed to do the graphics.
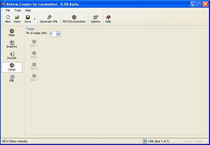
VehicleCreator - With this programm you will make the XML and the DAT for your vehicle.

First start the VehicleCreator v.0.07. Use the offered path and remember where it installs to. It will tell you that the file zlib.dll is missing now. Search for it in the internet (Link) and put it in the folder the programm is in. In there you put the .zip-file containing the version 0.8 as well. Unzip and override all files if asked to.
To keep it easy I put the programm MSTS2loco in here as well and I also unziped it already. Do a shortcut to your desktop and klick the "Install.bat". Then it´s ready.
To prevent lots of scrolling I created a folder "DAT" on my C drive. That´s my work-folder.
In there you put the unzipped locomotive (or whatever you want to work on) now. Furthermore I created a new folder called "PNG" in that one. That´s where you put the according pictures later on.
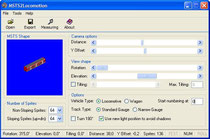
The first thing to do now is to open up the programm MSTS2loco.

One little clue:
Don´t use the integrated tool MSTS2loco in the Vehicle Creator. It´s an old version and you can´t do all you need to do with it.

Open the .s-File of the locomotive with this program. On the left you can see a preview. It is important that it´s one .s-File because the program can't load several files. Exceptions are the vehicles with several units. These will be loaded one after another.
Before you start to play around, I´ll explain each button to you.
1) Distance - Distance between objects. 38m is a useful value. However, it is better using 36m.
2) y Offset - This adjusts the distance to the rails. The given value is optimal.
3) Rotation - With this controller you can rotate the vehicle to check it.
4) Elevation - Controls the pitch. Everything works automatically, you don´t have to set anything.
5) Tilting - Shall be marked for vehicles with tilt technology. Most vehicles have only 8 % so you can assume it.
6) Vehicle type - Find out if it is a locomotive or a wagon with identical side views. Then it will only create the half of the pictures because every side looks like the other. In the Vehicle Creator you must indicate that too. I personally always choose the full pictures because the savings are just some kB.
7) Track type - Choose standard trace or narrow gauge.
8) Turn 180° - This allows you to rotate the vehicle 180 degrees. The front must be on top.
9) Use new light position to avoid shadows - IMPORTANT !!! There must be a hook inside. Otherwise you have ugly shadows in the graphic.
10) Start numbering at - Here is to specify in which frame to start. This is important for multi-part multiple trains (EMU / DMU), because the second part begins with images nr. 136.
11) Measuring - This is an almost transparent template which you can put on the car to see if it is too long. It should not go beyond the frame.

OK, when everything is ready you can press Export and now you can see how the locomotive turns during the program makes the pictures.
The pictures that are just made will be in the same folder as the locomotive.
You have to convert these pictures from .bmp to .png with Wally (see this tutorial). And all colours will be pitched because it has only 256 colours.
When you're finished you have .png's for the game.
Now copy the .png and paste it in the folder "PNG". We don't need the .bmp anymore.
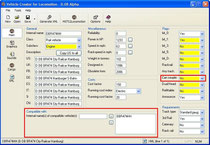
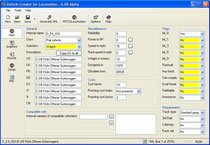
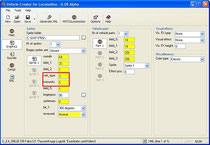
Open the program VehicleCrator.

Below I'll explain the fields.
1) Internal name - That's the filename. It can has 1 to 8 characters or numbers. Later you can rename it if you want
to. But long names will make Locomotion slower.
2) Class - Unfortunately, you can only set it on "Rail Vehicle".
3) Subclass - Choose whether you want to create a locomotive or a waggon.
4) Description - With this, the US-label will be pasted in every other language.
5) US/UK/FR/DE/... - Here you insert the other designations which will be appear in the game. But don't use special characters like !?&$...

6) Reliability - Value of the reliability during the purchase.
7) Power in hp - Performance in amercian horse power. This value differs from the european system. You can use our calculator for solving this problem.
8) Speed in mph - Speed in miles per hour. You need the calculator
again.
9) Rackspeed in mph - Speed on acclivities in mph. It's only important on narrow track vehicles with gear drive.
10) Weight in tonnes -Weight in tonnes.
11) Designed in - Designed in.
12) Obsolete from - Not longer available from this year. That means, when you know that the vehicle was scraped in 1985, you write 1986. If the vehicle didn't scraped so far, you put in the numbers 65535.
13) Cost factor - Cost factor. Is responsible for the development of costs when purchasing a vehicle. The values vary between 80 and 150. Try to find out, which value a similar original vehicle has in the game. Use to the programs from Digidampfman.
14) Running cost index - Choose here what kind of vehicle you have. For waggons you let it on "not powered".
15) Running cost factor - Cost factor for the running costs. 2-5 is normal for using waggons. For locomotives it can be between 18-25.
16) Compatible with - Compatible with the following vehicle(s). Set here the filename if your vehicle should be connected to others. Makes only sense if the others are also set on it.
More than 7 links will not let you start the game.
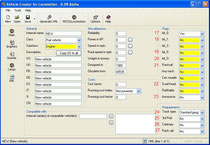
17) bit_0 - "yes" for locomotives, "no" for waggons.
18) bit_1 - "yes", when the vehicle shall be ahead when turning.
19) bit_5 - "yes", the drive waggon is in the middle of the train. E.g. the APT.
20) bit_D - "yes" only for steam locomotives.
21) Rackrail - "yes" only for narrow-track vehicles with gear drive
22) Dual Head - Set "yes", if the train requires two units of this type. E.g. the original TGV.
23) Announce - The player should receive a message that the vehicle is now available? That makes no sense for waggons.
24) Track type - Choose the track type.
25) 3rd Rail - Does the vehicle needs a power rail?
26) Catenary - The vehicle requires a catenary? "yes" for electric locomotives.
27) Rack rail - Does the vehicle requires a gear drive?
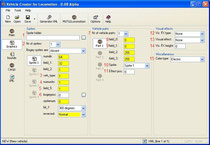
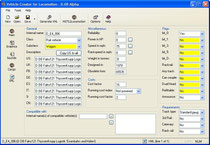
1) Sprite folder - Search the folder where the finished .png's are included.
2) Nr of Sprites - Specify, how many are pictures in the folder. This is important if the vehicle is composed of several parts. More on this below.
3) veh_type - Locomotives and waggons get a one. Waggon with different states of charge (animated waggons) will get a three.
4) numunits - Usually is a one. For every state of charge you need a separate set. (empty - half full - full = 3). So
you need to indicate the number of sets you have in your folder.
5) field_5 - Regular vehicles have to get a one. Vehicles with tilt technology use three.
6) bogeypos - Distance between the wheels. It's easier when you press the button on the right and the program will
make it itself.
7) Nr of vehicle parts - How many parts has the train?
8) field_0 - A value between 10-12 fits in the most cases.
9) field_1 - A value between 10-12 fits in the most cases.
10) Sprite - Choose the images for this part of the train.
11) Effect pos - Indicate the position, where the effect shall be (e.g. steam). You can use everything between 20-180, but the highest value is ahead.
12) Vis.FX type - Choose the type of effect (diesel, 3rd rail, electric catenary...).
13) Visual effect - Determin the kind of effect (diesel scoot cloud, electric spark, steam
cloud...).
14) Vis. FX hight - Height of the effect. Diesel and steam locomotives should use 20-22. On electric locomotives 28 is
a good value.
15) Color type - Choose a category for the colour of the vehicle.

Start sound & Running sound - Listen to the sounds and choose one.
Nr of cargo slots - Number of cargo slots. Normal locomotives don't have this but on motor trams, passenger and freight cars you have to indicate, how much and what they can transport.
But you can only cover two slots with the same freight and the max. value is 255. E.g., you can tansport up to 510 people when using two units of people and the values of 255.

Back to our sample locomotive.
I've inserted all data and for the reason that we've got a drive car, I don't have to insert anything in the tab "Cargo"


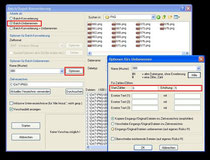
Now click on "Generate XML". It may takes some time but than you see some lines at the bottom.
The more units the vehicle has, the more lines will be written.
After that, click on the arrow right next to the field "Save". First you have to choose "Save XML as..." and then save it. You have to do it also with "Save DAT as..."

At the last tab "XML" you see the file's data. When you want to edit something, do it always in XML directly. Never in Vehicle Creator. The Vehicle Creator thinks it
is a fault and it gives you an error message.
Now move the .dat file in your ObjData-directory. That is on C/Program Files/Atari/Locomotion/ObjData.
After that, restart the game. If it starts correctly, the first obstacle is done. Go to the Scenario-Editor and turn on the advanced mode. Then click on the locomotive icon and search for the names in the list. If the image is turning slowly the next obstacle is finished. Choose it and create a test scenario. There you can see the vehicle working. Let it drive some rounds and look if it is doing well.
If so, congratulations, you converted your first vehicle for Locomotion.
Now you should make a readme file. The following things should be included:
- Author of the MSTS model
- Author of the textures
- When appropriate, the author of the repaints
- the rights of the author of the MSTS model remain
- of course yourself as the author of the Locomotion model
- Date and version number of the vehicle
- Name of DAT and internal name (the vehicle name in the game)
Vehicles with more parts

Lets make a new vehicle, but now with more parts. In our case a model of the 2 part "S-Bahn" from Hamburg, class 474.
(©Richard Bergmann)
There are not that many differences between the procedure above and this one.
First, you need the clearance and then get the specifications. After you have all you need, start MSTS2loco.
The front is to be done as described in the tutorial above.

If there shouldn't be a posterior model with turned waggon, make a tick at "Turn 180". Otherwise you can omit it.
At "Start numbering at", you have to write in 136. The images 000-135 are for the anterior model. So the images 136-271 are for the posterior model. As a result you don't have to rename the files. To create the .dat, the images must get in a folder anyway.
Work with Wally as described before.
Then start the Vehicle Creator.
It's important, that you indicate the performance of all drive motors. Furthermore the total weight of the complete train.
If you indicate the name of the vehicle you have just made in the field "Compatible with" and in the field "Can couple" "no", the vehicle can be only coupled with the same type of vehicle.

This stage is very important.
Since the model has two parts, you must change the number of the sprites at the tab "Graphics". In this case up to two. Look at the fields below, the fields Sprite1 and Sprite2 have to be identical.
With exception of "bogeypos"! This must be defined in both cases. Let the program do that work.
Furthermore this has also to be defined in the central section. And don't forget to set, that the first part uses the Sprite1 and the second part uses the
Sprite2.
Then there is the "Effect pos". Now you must know, at which place of the vehicle the steam will come out or where the pantograph
is.
At the tab "Cargo" you must indicate the number of passengers. Namely all! Or you split it in two slots.
Then create the XML. This XML has 1790 lines.
Check it and write a readme.
Simple animated freight wagons
With this model, type Kklm, I show you how to animate a waggon
(copyright(c)Volker M. Bollig)
Animate means, that an empty waggon, when loading, goes from empty to half-full and then to full.
We need a model in the empty state and one in the full state. It's good to have one model in the half-full state. If not, we take the other two states.
First of all, make the images with MSTS2loco. It makes a new folder for every .s-file. Therefore we don't have to change the start number.
If you don't have a waggon in the half-full state, then copy the folder in the full state. Then start the program IrfanView.

The images have to alternate. Now you have 3 folders with 136 images in every folder. But the order in Locomotion must be like this:
000 - empty
001 - half-full
002 - full
003 - empty
004 - half-full
005 - full
006 - empty
aso.
For this you choose Batch-Conversion/Rename. Then choose "Batch-Rename". Click on options. Write 000 into the Start-Counter and 003 into Increase.
When the program have done the work and you make the next folder, write 001 intro the Start-Counter. On the third folder, you write 002 intro Start-Counter.
Just check if all loading conditions rotating as described above. Then use Wally
Afterwards, start the Vehicle Creator. Put in your data on the main page. (At weight set the empty weight of the waggon)

In the tab "Graphics" you must set a three at "veh_type" for the animiated waggon. Below also a three at "numunits". Now click the right button at "bogeypos" for the automatic distance determination.
Fill out the rest of the fields with your data, determine the freight and create the XML. It has to be 2576 lines (with one type of freight).
Then create the XML and .dat file.
Lets test it ingame. Over 33% it must show the half-full state and over 66% the full state.
Don't forget the readme.
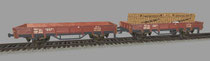
Multiple animated freight waggons

In this section, we want to create a multiple animated waggon. In this example a self unloading car Falns121 from ThyssenKrupp Logistik. "Eisenbahn und Häfen".
(copyright(c)Manfred Laugwitz & Werner Spieker)
Multiple animated means, that the waggon can transport coal and iron ore and it will show empty, half-full and full state of every
freight.
Therefore we need these following things:
- full
- half-full with coal
- full with coal
- half-full with iron ore
- full with iron ore
One time empty is enough because everytime it will go back to that state. The higher the freight-ID is, the further back the freight will be. But be careful, not more than 1000 images, otherwise you can get problems with Locomotion.
Create the pictures as written above and it should look like this:
000 - empty
001 - half-full with coal
002 - full with coal
003 - half-full with iron ore
004 - full with iron ore
005 - empty
006 - half-full with coal
007 - full with coal
aso.
Now you should have 680 pictures.
Do the Batch-Rename just like by the simple animated freight waggons. But this time, we increase it about 5, not 3 like above.
After that, edit it with Wally and open the Vehicle Creator.
This time you indicate a five at "numunits". As a result, the program don't determine the bogeypos on the basis of the image Nr.8, but Nr.40.

Since coal and iron ore uses the same cargo-ID, it needs only one slot.
Now create the .dat, test it and write the readme.